
![]()
Introduction
At a high level, the process to make a basic high quality GIF is just:
- Import a video into a video editor
- Place some text over it
- Save it as a video file
- Convert it to an animated image file
Simple enough. Most high quality GIFs are just video clips with fancy captions on them. But the video editing software that is used to make them can be rather complex to wrap your mind around as a beginner. Editors have a whole lot of options available to you right away, which can be intimidating. Which buttons do you actually need to press? Which buttons are for more complex things that don’t really apply to what you want to do? In this tutorial, I will highlight the few tools and buttons in Kdenlive that you would need to actually focus on in order to create a GIF. In my experience, Adobe After Effects is by far the best tool for the job, but as a FOSS enthusiast nowadays, Kdenlive is my go-to. Many things may take more steps and manual work to accomplish, but it is still a rather capable software, and simple enough to create just about any GIF you would want.
Prerequisites
- A computer: There is a slim chance you could manage to follow this tutorial by making a bunch of subsititutions for mobile software. The main software that we are going to cover here (Kdenlive) is simply not designed for mobile use. I would also consider this to be a Linux-centric tutorial, but everything here should be doable on other desktop operating systems.
- Kdenlive: This can be installed using the package manager of most Linux distributions. It is also available as a Flatpak, AppImage, or macOS/Windows build from their website.
- Source video: A DRM-free local video file of whatever source material you want to make a GIF out of (TV show, film, etc.). Kdenlive can accept many file formats/codecs, and seems to be able to reformat/transcode everything else into something that it can accept.
- ffmpeg: This is most likely already installed on your computer. Run the command
ffmpeg -version, which will print out the version if it is installed, or produce an error if it is not. If necessary, you can get it from your package manager or their website.
Key term overview
Many video editors have user interfaces and features that are very similar to one another. These are the key Kdenlive terms that are relevant to creating GIFs:
- Project: The workspace and settings for any given video you want to make are all part of a single
.kdenlivefile. This is the project file for the video. This file does not contain the actual source video file you will create your video out of, or the final video that gets rendered/exported. Instead, it contains all the logic and instructions that you come up with (as well as pointing to where on your computer the source video clips are actually stored) in order to tell Kdenlive how to compile everything into the video. As an example here, we see five files in the same folder:
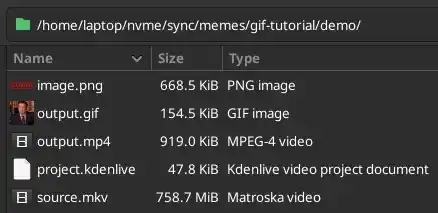
project.kdenlive: This is the Kdenlive project file itself. As you can tell by comparing its file size to the other files in the folder, this is a very small file. That is because it is effectively just a list of instructions. If you were to open this file up in a text editor, you would see that it is literally just a bunch of text in XML format.source.mkv: This is the video file of the full TV episode that this GIF was made out of. Notice that its file size is much larger than that of the project file. That tells you that the video file itself is not embedded within the project file or anything. The project file simply references the file location of the source video file.image.png: Just like how the source video is not embedded into the project, the same goes for any images or any other files that you might want to include in your project. The project file simply points to where the image file is located.output.mp4: This is the video file that gets rendered by Kdenlive (more on that later).output.gif: After converting the MP4 that was rendered, this is the final GIF that is produced.
- Render: The final action you take in Kdenlive in order to export your video. While arranging all the video clips, text, and effects within your project, what you are really doing is just creating a list of instructions that tells Kdenlive how to render the video. You might think of it like a recipe: arranging clips, etc. is like writing a recipe, and rendering is when Kdenlive programmatically follows that recipe to cook the video as you had instructed.
- Project monitor: The upper right portion of the Kdenlive interface that you use to preview what the final result will look like. While you move things around and adjust effects, this shows a realtime preview of those changes. This is by no means a perfect representation of what the rendered video will be, but it should be far more than a passable approximation as you assemble your project to get it ready to render.

- Profile: The underlying settings that dictate the resolution, aspect ratio, and frame rate of your project. It is always possible to change the profile of a project after you have already begun making your edits, but doing so will often require you to rework those edits to fit the new profile. It is recommended to select the right profile before you start making edits to the project.

- Clip: The main component that will make up your video/GIF. The video file(s) for the TV show, movie, etc. that you want to place text over.
- Title clip: The text that will be placed over the video clip. You do not import a title clip like you would import a standard clip. A title clip is something that is created entirely within Kdenlive.
- Project bin: Sort of a “waiting area” for your clips. Whatever files you import into your project do stay exactly where they are in your computer’s filesystem, and another copy is not made just because they get imported. The project bin is moreso just a visual representation of which files are ready to be arranged in your project.

- Timeline: This is your “working” area. You take the clips from your project bin and arrange them onto the timeline in order to include those clips in your final video. The timeline runs from left to right, meaning that a clip on the left will play back before a clip on the right.

- Track: In addition to arranging clips from left to right in the timeline, you can also arrange them on top of each other in the timeline using Tracks. For example, placing text on a video clip is as simple as setting a video clip in track one and then a title clip in track two right on top of it.
- Effect: Besides simply arranging clips in the timeline, most of your work will be done with effects. To make your text fly across screen, apply an effect. To cut off one edge of a video clip, apply an effect. To turn a full-colored clip into black-and-white, apply an effect. There are many effects to choose from, and using various combinations, there are multiple ways to achieve just about anything you could do in Kdenlive. You can layer as many effects as you want to a clip, and even apply the same effect to a clip multiple times. Most effects have their own settings, allowing you to control things like how intensely the effect affects the clip, the position, the color, etc.
- Keyframe: Some effects are simple, and just adding the effect to a clip makes it manipulate the entire clip uniformly. Other effects allow for the use of keyframes to apply the effect differently at different points in the clip. Each of these effect layers have their own “timeline” that runs the duration of the clip that the effect is applied to. When you add a keyframe onto that timeline, you can change the effect’s settings at that keyframe. If you then add another keyframe to somewhere else in the effect’s timeline and change its settings as well, then the effects settings between the two keyframes automatically adjust accordingly.

Steps
- Assemble files
- Locate all the source video clips and/or images that you need for your GIF. It can be helpful to make a new folder specifically for your project, and place all relevant files in there. This would also be the folder in which you will want to eventually save your
.kdenliveproject file to.
- Locate all the source video clips and/or images that you need for your GIF. It can be helpful to make a new folder specifically for your project, and place all relevant files in there. This would also be the folder in which you will want to eventually save your
- Set up workspace
- Open up Kdenlive
- For creating GIFs, I generally switch to the “Effects” workspace layout using the workspace selector in the upper right corner of the window. You can do just about anything in any workspace, but different workspaces just arrange different areas into different places in order to make certain tasks more efficient.

- I also remove the “Audio Mixer” section (in the bottom right corner) entirely, since the final GIF will not have any audio anyway.
- Optionally, set the project profile (Project > Project Settings)
- Import files
- In the project bin, import the video/photo files you need

- When you import a video file, Kdenlive will compare the video’s resolution and framerate to that of your project’s profile. If the two differ, Kdenlive will provide a small prompt offering to switch your profile to match the imported file.

- Unless you know that you want your final GIF to be a different aspect ratio (i.e., you want to make a square GIF out of a 16:9 TV show), I recommend to match your profile to your source video.
- On the other hand, it can be beneficial to set your profile to a higher framerate than that of your source video (while using a profile that has the same resolution as your source video). Even though most TV shows are around 24 FPS, using a 60 FPS profile allows you to more finely place keyframes on your effects (this is what I prefer to do). But if you don’t plan on doing anything complex with keyframes, having a high framerate is unnecessary and can just lead to a larger final filesize.
- In the project bin, import the video/photo files you need
- Place clips on timeline
- At this point, you can simply drag-and-drop your video clips from the project bin onto one of the tracks in the timeline.
- You can then locate the part of the clip that you want to make a GIF out of. Grab the edges of the clip and pull them in to narrow the clip down to just the target area. You can also cut the clip by right-clicking it and selecting “Cut Clip”.

- Finally, move the truncated clip backward to the beginning of the timeline.
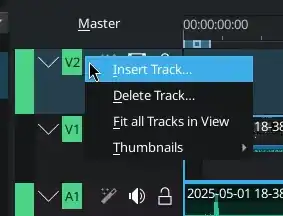
- The timeline can have multiple tracks. By default, there are two video tracks and two audio tracks. As you might expect, clips that get placed on an upper track ends up appearing in front of clips that are on a lower track. You can always add/remove tracks by right clicking.
- Text layers
- Once you get the base video layer down to what you need, the next logical step is to create the text layer. This is, of course, assuming that your video has some sort of dialog or something that you would like to caption.
- Create a new title clip in the project bin for each paragraph of text that you want to appear onscreen at once. If your source has just one or two lines of dialog that you can comfortably fit onscreen at once, then just make one title clip containing all that text. Otherwise, if you want to include more text than can fit onscreen at once, you will want to split the text into multiple title clips. You can later use effects (explained in the next step) to transition each title clip onscreen/offscreen as needed.
- While editing your new title clip, you can change the typeface (font), size, outline, and other common text attributes. When it comes to sizing the text, it helps final readability if there is some empty space between the text and the outer edges of the frame; do not place your text right up to the edge. I also like to place the text in the dead center of the title clip, instead of placing it towards the bottom (where you want it to end up in the final GIF). You can always use effects later to put it in the right place, and I will explain further in the next step why I prefer to do it that way.
- Apply effects
- Depending on your needs, applying effects could be optional. It is absolutely possible that all your GIF needs is some static text to appear on top of a video clip. Or even just a short clip of someone’s facial expression with no text whatsoever.
- On the other hand, using effects can help fix things to make your clip work better as a GIF and/or add some visual appeal.
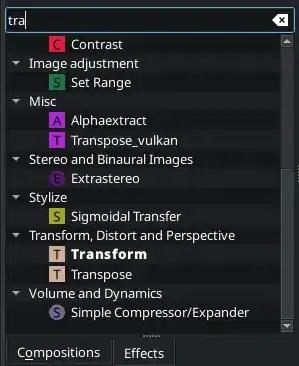
- Applying an effect is simple: find the effect you want in the Effects widget, then click-and-drag it onto the appropriate clip in the timeline
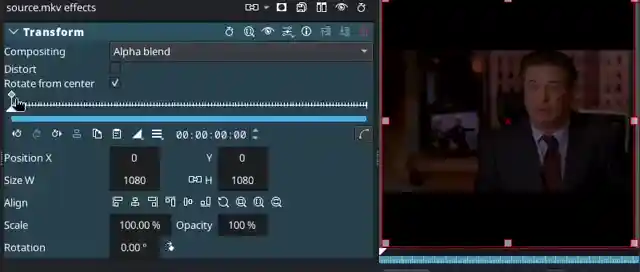
- Perhaps you want to adjust your video clip so that the subject of the clip is in the center of the frame. In that case, you can apply the Transform effect and adjust the X value to move the clip into place. Maybe even zoom in a bit.

- Effects can also be used for color correction. If your video clip appears overly red, apply the RBG filter and adjust the sliders until it looks right to you. Make a clip black-and-white by applying Saturation and turning it all the way down.
- Crop down a clip using Crop, Scale and Tilt
- Perhaps you want to adjust your video clip so that the subject of the clip is in the center of the frame. In that case, you can apply the Transform effect and adjust the X value to move the clip into place. Maybe even zoom in a bit.
- You may find that there are many effects that do some of the same things as one another.
- To move something across the screen, you might use either Transform or Translate.
- You can zoom using either Transform or Pan and Zoom.
- You can crop using Crop, Scale and Tilt, or Crop by Padding.
- There are many effects that are similar but work a little different from one another, so experiment with what works best for what you are trying to accomplish. Hint: At the time of writing, I have gathered that if something can be achieved using Transform, that is most likely the best effect to use.
- Many effects allow you to use keyframes to set different values for the effect at different points in the clip. For example, you may want your video clip to slowly zoom in. In that case, using Transform, create an keyframe at the end of the clip by double-clicking on the keyframe timeline. On the beginning keyframe, set Size equal to 100%, then set the end keyframe to 120%. When you play back the clip, it will then automatically zoom from 100% to 120%.
- Note that not all effects allow keyframes. For some effects, such as Flippo, the effect is applied the same way throughout the entire clip.
- Just like how the timeline has tracks/layers, so do effects within a clip, making up what is called the clip’s “effect stack”. This allows you to apply multiple effects to the same clip (even multiple of the same effect, if you need). When the effect stack gets rendered, it does so from top to bottom. This is important to note, as behaviour can change depending on the order in which you layer your effects.

- Any effect can also be used on a title clip in the same way you would use it on a video/photo. Use effects to make your text do cool tricks around the screen, but be careful to make sure that the final result is still legibile! As the creator of the GIF, you know exactly what the text is regardless of how much it is flying across the screen. But your audience needs that text to remain relatively still for at least long enough for them to read it and decipher what it is.
- Also make sure that the text is large enough to be legible. Most users will not be viewing your GIF in fullscreen, so make sure it can be read by someone who comes across it embedded in their feed or a comment section.
- As alluded to in the previous step, you may experience unexpected behaviour when using effects to zoom or rotate the text if you had already positioned the text within the title clip editor. The center of the title clip is the anchor point from which the clip is rotated about or zoomed. See the below animation for example.

- We have two different title clips here: one which has its text placed at the bottom of the title clip, and one with the text in the center.

- They both have the same Transform effect that zooms in from 1% to 100%
- The second title clip also has an additional Transform effect added underneath the first one. This effect has moved the text down so it is at the same height as the text in the other title clip.

- Notice that the text in the first title clip is zooming from the center of the project until it reaches the final position at the bottom.
- On the other hand, the text from the second title clip stays at the bottom the entire time
- While it is possible that you want the behaviour of the first title clip, in my experience, what I always want is the behaviour from the second one.
- We have two different title clips here: one which has its text placed at the bottom of the title clip, and one with the text in the center.
- Render project
- After all your edits have been made and the preview looks nice in the project monitor, it is time to render it all as a video.
- In the Kdenlive menu bar, click Project > Render
- Choose where you would like the video file to output to. I typically save it into the same folder where the project file itself is, but maybe you want all the video files for all your different GIFs in the same place.
- Choose the render preset to use. The default at the time of writing is MP4-H264/AAC, and I find that works great for my needs.
- Optionally check “More options” to view some additional things that you can tweak. I do not mess with these as part of my workflow, but here are some changes to consider:
- Rescale: Instead of rendering at the resolution that is set by your project’s profile, you can use this option to make the video smaller (or larger, though that would obviously make it more blurry). I prefer to keep the video at as full of a quality as possible, and only rescale it to smaller resolutions in the next step when I convert it to an animated image.
- Audio: If you had not already muted the audio track while making your edits, you can also remove the audio this way. Either way leads to the exact same rendered file. Removing the audio leads to a smaller file size, but you may actually want to keep the audio if you do want to use the rendered video for any other reason. Regardless, any audio will eventually be removed if you follow the next step.
- Custom quality: I find the default MP4 quality to be a good tradeoff between file size and visual quality, but you can tweak that here if you would like.
- Click “Render to File”, and Kdenlive will generate your video file for you. Once it has completed, open it to make sure it looks good to you. If not, make whatever changes you need to the project in Kdenlive and render again until you like the result.
- Convert to animated image
- In many ways, this is also an optional step. An MP4 rendered by Kdenlive works great as an animation. You may be able to upload this to whatever website you choose, send it to a friend, or whatever. MP4 is a standard file type supported basically everywhere, and has a reasonably small file size. But there are many instances in which an animated image file like a GIF is preferable to a video file. Fortunately, converting the MP4 is very simple.
- While you may have read through this entire tutorial expecting to produce an animation in GIF format, I actually highly suggest creating using WEBP format instead. In short, this format is preferable because it offers better quality at a far smaller file size. There are also other modern animated image formats like APNG and JPEGXL, but I only have experience with WEBP.
- You may have noticed that Kdenlive itself actually offers the option to render the project directly as a GIF/WEBP instead of rendering it as an MP4.
- In my experience, Kdenlive renders a GIF with an obscenely large file size, and it offers you fewer options to customize your final GIF compared to rendering an MP4 and converting it to GIF using other means.
- While the file size of a WEBP rendered by Kdenlive is no issue, it does not loop. You likely expect any animated image to endlessly loop, but WEBPs from Kdenlive play through once and then simply freeze at the final frame. There does not seem to be any option to render them in a way that they keep looping.
- The best way that I have found to convert the MP4 is using ffmpeg. This may seem intimidating, as it is a console/terminal program, but it is fairly simple.
- The most basic command to convert
myvid.mp4to an animated WEBP calledmyimg.webpwould be:ffmpeg -i myvid.mp4 -vcodec libwebp -loop 0 myimg.webp - This command will simply create a looping WEBP in the same directory (without altering the video file in any way).
- Some additional options that I like to use:
-y: Automatically overwrites an existing WEBP with the same file name. This is useful because I often convert a video, watch the resulting WEBP, notice something is off, fix it in Kdenlive, then render/convert again. Without-y, it will promptFile 'myimg.webp' already exists. Overwrite? [y/N], and I would rather it just automatically overwrite without waiting for my permission.-hide_banner -loglevel error: These two options simply reduce the extra clutter in the console while ffmpeg is working on converting the video. With these two options in use, it will still print out any errors that it may run into, but if everything is going as planned, I do not need to see exactly what ffmpeg is doing in the background.-fps_mode passthrough -vf "fps=25, scale=-1:500": This changes two things:- Framerate/frames-per-second: I prefer to create the Kdenlive project at a high framerate, and then convert the video to a WEBP that has a smaller framerate. This allows for me to more precisely place/move text exactly where I want it to be at any given point, but still end up with a WEBP that has a reasonable file size. As mentioned earlier, most TV/movies will have a framerate of about 24 FPS; setting a framerate lower than the source will decrease the file size but make it appear choppier, and setting a framerate that is higher than the source will increase file size without increasing quality at all.
- Resolution/scale: Similar to the framerate, setting this lower than the resolution of the source reduces file size, and setting it higher increases the file size with no benefit.
- You could set it to something explicit, such as 500px wide and 500px high by using
scale=500:500. - Using a
-1as one of the two axes allows ffmpeg to determine the size to use for that axis in order to keep the output file at the same aspect ratio as the input file. For example, if the video was 1920x1080, settingscale=500:-1would explicitly set the width to 500 and determine the height to use as 281. Alternatively,scale=-1:500would convert to 889x500.
- You could set it to something explicit, such as 500px wide and 500px high by using
-quality 80: Reduce the quality of the image (from 0 - 100), resulting in a blurrier picture with a smaller file size.- Put it all together, and we get a command like:
ffmpeg -y -hide_banner -loglevel error -i myvid.mp4 -vcodec libwebp -loop 0 -fps_mode passthrough -vf "fps=25, scale=-1:500" -quality 80 myimg.webp
- If you do need the image in GIF format, see this article for instructions on converting a video to GIF with the command line: https://www.digitalocean.com/community/tutorials/how-to-make-and-optimize-gifs-on-the-command-line
Additional Resources
- Kdenlive manual: In many ways, this tutorial is just a concentrated version of the official Kdenlive manual that also only focuses on a limited number of topics. If you are confused about anything mentioned here, it may help to look up that subject in the manual and read more deeply about how it works. https://docs.kdenlive.org/
- Internet search: Kdenlive is a fairly popular program, so it is very likely that if you use a search engine to search something like “kdenlive crop without moving”, you will find some resource offering help on that very topic. This often also leads to video tutorials on the topic, if that is more your style.
- My repo: I have created a git repository on Codeberg for all the 30 Rock GIFs that I create. The Kdenlive project files found within (both the files for the completed projects as well as the template files that I used as a starting point for all of them) could help to provide additional insight into my own workflow that might assist your understanding of the concepts covered in this tutorial. https://codeberg.org/saworden/30-rock-gifs
Conclusion
Following this tutorial should help to provide you the necessary skills to create a high-quality animated image to be shared online. This tutorial did only cover the basics to get you started, so there is much more for you to learn and experiment with as you continue on your journey.
Archive of this post: https://web.archive.org/web/20250502224132/https://feddit.org/post/11802992